Today’s guest post comes from Lesley over at The Design File. She’s a fellow home owner doing her magic all the way in Indianapolis. She is going to share her fantastic front porch makeover with us! So get excited and welcome Lesley…
Hi. I’m Lesley from The Design File. I’m so pleased to be guest posting today here at A Design Story while Lindsay and Kevin are spending some quality time back at “home”.

Lindsay asked that I show you a room renovation and I decided to go with my enclosed porch, which I redecorated last year so that it made a more interesting and welcoming entry for our small Indianapolis home.
With help from friends, I did it on a budget — less than $300! — because my husband and I were squeezing it in between other projects.
Here are the three ideas that made this project work on a budget:
- Reuse & recycle
- “Shop” your own home
- Be creative with materials
Here’s how we made those elements work for us.
The floor
Because we were decorating such a small space, remnants were the perfect answer for our flooring.
We made a few shopping trips to Menards until we found just what we wanted — a great carpet for the
main part of the room and a linoleum cutoff for the area right inside the door. It’s amazing what you can get for next to nothing if you’re willing to use someone’s leftovers.
The curtains
The biggest thing I wanted to do here was add curtains, which I thought would make the room seem homier and bring in some great color.
I found these burnt-orange grommet-top panels on clearance at JCPenney, but I couldn’t stomach the more than $150 it would have cost to buy 25 feet of curtain rod.
So I bought some inexpensive galvanized metal conduit and some
couplings and hung it with oversized cup hooks.
Total cost: $14.
It’s
not something I would do in a formal dining room, but on a porch with
grommet-top panels, it worked perfectly and was an incredibly easy
installation.
The lighting
The idea for this porch redo actually began when we purchased a new chandelier for our dining room and took down a $39 light I’d purchased about eight years earlier at IKEA (it’s still for sale there today). I knew right away I wanted to use the old chandelier on the porch and eliminate a ceiling fan that hung so low it nearly cut my husband’s head off.
My husband had to do a bit of rewiring so that we had enough slack to
swag it from the electrical box in the center of the room to the spot over the table, but we
didn’t change anything else. I love it on the porch more than I did
over the dining table.
The furnishings
Originally, I bought an off-white, upholstered chair with a little bit of a mid-century feel to use as the focal point of the porch’s conversation area. But when I brought it home, it just didn’t work. It was too short and wide.
But the chair looked perfect in our living room. So we swapped it out with a wooden, arts-and-crafts style chair (see below) we’d purchased a couple years ago for $100 from Walmart. It was perfect!I then brought out the wooden, swivel desk chair my grandfather had used in his shop and two red oak folding chairs my husband had made several years ago to use as extra dining chairs at Thanksgiving and other parties. The desk and dining chairs had been sitting unused in our basement.
I already had one of those particle board round tables on the porch. So I bought a neutral, tan tablecloth and a small piece of gorgeous, green fabric I found on sale at Jo-Ann to give the table a little pop.
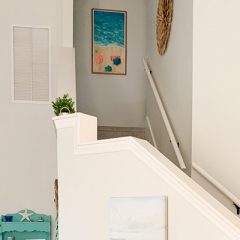
The art
I wanted something colorful (see the photo above right) just to the left of the front door where
there’s a small strip of floor to ceiling brick. But I didn’t want to
spend much or put anything too valuable in place where it could get
bleached by the sun.
So I picked up a packet of scrapbook paper from a
$1 bin at Target that coordinated with my other colors and framed the pieces
using some square, shadow box-style frames I’d picked up a few years
earlier.
The rest
Finally, I filled out the space with a few pieces from the rest of my house, a couple plants, and a $15 table/stool I bought at Target.
I use the latter as a side table most of the time, but when we’re using the room as overflow for a party, I just take off the plant and it’s another place to sit.
I hope you enjoyed reading about our room redo as much as I’ve enjoyed using it. To see more projects, home tours and design tips, stop by The Design File anytime. I’d be thrilled to have you visit.
Thank you so much Lesley, your room makes us want to come on over for some reading and relaxation! How about you guys? Don’t forget to pop over and see more ideas from Lesley on The Design File. So, what do you think? Have you decorated a fabulous space on a frugal budget? DO TELL.
All images courtesy of The Design File.


Leave a Reply