A Design Story

... stories of design, inspiration and mommyhood

  • The Story
  • Blog
  • House Tours
  • Contact
  • Shop My Instagram
  • Home
  • Advertise
  • Need A Designer?
  • Shop My Instagram

December 9, 2010 by Lindsay

DIY Yarn & Felt Wreath

It’s the holidays and there’s no better time to get crafty!! Awhile back, I made a list of all the crafts I wanted to complete for our home (for the holidays). Some were easy, some hard… but all were inexpensive! I have been hard at work gluing, wrapping, cutting and crafting some really fun decorations. As it happens, a yarn wreath was on the top of my list!

I was browsing through TJ Maxx awhile ago and spotted the cutest yarn wreath for around $20… although I am interior designer and do buy right off the shelf or design my own décor for clients at that price or higher, for me and our home… I do get crafty at times!

At right around $5 for this craft… the Mr. was so proud! Ready to make your own Yarn Wreath?

Here’s What You’ll Need:

– Styrofoam Wreath Ring (I got mine from the Dollar Store)

– Hot Glue & Gun (I had already)

– Two Pins (I had in my sewing kit)

– Yarn of your choice (Michael’s Craft Store)

– Felt of your choice (I had already)

Directions:

Step 1: Pin the end of your yarn string to begin wrapping.

Step 2: Wrap wreath with yarn. You will want to keep it tight, and keep in mind that it is close to impossible to have the yarn perfectly lined up on the entire wreath.

* My ring was small so I didn’t even use one roll of yarn.

Step 3: When you have your entire ring wrapped with yarn, cut the string and pin the end into the ring.

Step 4: Make felt flowers:

– Cut a circle out of felt. Keeping in mind that the bigger the circle, the bigger the flower.

– Cut around the outside of the circle to make it have a waved look.

– Pick any point on the circle to start cutting the felt. You will be cutting a large spiral shape so that you will end up with one long thin strip of felt.

– When you get to the very end, you will have a circle or oval shape left that you will want to leave and not cut into. This will be the base of your flower.

– Take the end of the felt where you began cutting and start to roll. You will want to keep it tight in the beginning so it holds. If you want a smaller more circular flower, keep it tight. If you want it to have a more open look, you can keep it a little looser as you roll it.

Step 5: Glue the Flowers by taking the extra circle on the bottom of each flower and glue to keep each one tight.

Step 6: Cut out a few leaves to add the flowers.

Step 7: Glue the flowers and leaves to the wreath

Hang and Enjoy!

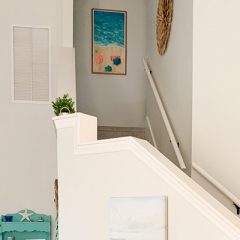
First I hung ours by itself in the hallway upstairs, but it looked a little lonely… so I grabbed a frame out of the closet and hung the yarn wreath from it. Love It!

It gives it a bit more personality and actually looks a little like “country Christmas”! What do you think? Have you been doing any Christmas Crafts? Do Tell.

 __________________________________________________________

IMAGES COURTESY OF A DESIGN STORY, LLC.  We joined up with Somewhat Simple’s Party & Beyond the Picket Fence.

Haven’t seen the other posts in our 12 Days of Christmas? Just click the image below!


Related posts:

It's a New Year
Designer Picks: Lamps.com
Partners in Christmas
Fresh Picks: July 2013
❮❮ Previous Post
Next Post ❯ ❯

Comments

  1. Melissa says

    December 9, 2010 at 2:06 pm

    I love the yarn wreaths. I made a variation of this. You can check it out over at
    http://pathb4me.blogspot.com/2010/12/yarn-and-button-wreath-tutorial.html

    I love the colors in yours and I really want to try my hand at making the felt flowers. Thanks for sharing!

    Reply
    • Lindsay says

      December 15, 2010 at 10:09 am

      Melissa,

      Me too! I have been wanting to try one for awhile… So glad I did! Really easy and inexpensive! Let me know how your felt flowers go!

      Reply
  2. Steph says

    December 9, 2010 at 6:10 pm

    Cute! I like the colors together 🙂

    Reply
    • Lindsay says

      December 15, 2010 at 10:08 am

      Thanks Steph!

      Reply
  3. Anita says

    December 10, 2010 at 6:17 am

    It turned out Great!!! Love it!!!

    Reply
  4. elissa, ebb & flow says

    December 10, 2010 at 7:44 pm

    it turned out perfectly! i love the yarn you chose.

    Reply
    • Lindsay says

      December 15, 2010 at 10:08 am

      Thanks Elissa!

      Reply
  5. Rose Graham says

    December 23, 2010 at 4:33 pm

    I love the yarn wreaths. I made a variation of this. You can check it out over at http://pathb4me.blogspot.com/2010/12/yarn-and-button-wreath-tutorial.html I love the colors in yours and I really want to try my hand at making the felt flowers. Thanks for sharing!

    Reply
  6. Enid Ballard says

    December 25, 2010 at 3:59 pm

    Melissa, Me too! I have been wanting to try one for awhile… So glad I did! Really easy and inexpensive! Let me know how your felt flowers go!

    Reply
  7. Sarah Ives says

    January 4, 2011 at 12:09 pm

    Isn’t it funny how the Holidays bring out the crafty in us? Thanks for posting your wreath. I’ve been wanting to make one and I appreciated seeing the step by step. I think having the frame around it makes all the difference in the look. Very cool!

    Reply

Leave a Reply Cancel reply

Your email address will not be published. Required fields are marked *

About Me

Hi, I am Lindsay Milner, the designer, fashionista, blogger & mommy behind A Design Story! I am a happy wife & momma that loves all things stylish! I love blogging, interior design, shopping, having fun on the beach, making our house a home, hanging out with family, drinking coffee & running around after our kiddos.

Welcome! Want to know more?
Click here for the full story.

Newsletter

Search

  • Heart Spoken
  • Amazon Store
  • Favorite Posts
  • House Tours
  • Mommyhood
  • Gluten Free Me
  • Family & Living
  • Fresh Picks
  • Videos
  • Our Wedding
  • Facebook Community
  • Loves

Instagram

adesignstory

 473    13422


  • My favorite place to be! Another glorious beach day with the kiddos! ⚓️☀️ Anna Maria is my happy place for sure… I can’t get enough!! I am dreaming of a home on the island in the future! What’s your happy place? . . . #vacayvibes #summerdays #summerlovin #givemethatsunshine #annamariaisland #floridaliving #ilivewhereyouvacation #myhappyplace #summertime #beachlife #beachlover #summerstyle #sunshinestate #floridainfluencer #blueocean #beachday
  • ☀️ Sea + Sun + Smiles We drove across the state last week for a vacay with family! Had a great time and I was so in the moment, I only took a few photos! We had incredible weather and basically lived our best lives all day on the beach and in the pool together! . . I have had a few messages asking where I have been on insta…. The truth is, I have been soaking up time with my kids, working on a few home updates and spending as much time at the beach and in our pool
  • Happy 4th of July! Grateful for America and freedom! Praying blessings over you all on this Independence Day! . . . #july4th #independenceday #freedom #letfreedomring #floridafreedom #america #americanstyle #floridainfluencer #coastallife #coastallifestyle #natebendersonpark #utc #utcmall #fireworks #babyyourafirework #americanfreedom #familylife #redwhiteandblue #sarasota #sarasotaflorida
  • Things are changing around here! I made a to-do list and one by one, I’m getting it done! I love a good re-fresh! This cute wall (mirror + furniture) is being moved to another wall and a fireplace will go in its space! The dining room is getting a new furniture piece and light… almost finished there! Lilah is getting a room re-do perfect for a big girl! Lots more on the list too!! Stay tuned…. What do you have on your home to do list? Anything fun! Share below! Sources on my link—> shop my insta! . . .
  • I was made for vacations like this! Best vacay to Seaside and Watercolor with my favorite people! I may or may not have taken a months worths of pictures… but these will do for now . . . . #30avacay #seaside #santarosabeach #watercolorflorida #vacay #vacaymode #bestvacayever #vacayvibes #beachvacay #familyvacay #familyiseverything #mylittlefam #lovemyfamily #seasideflorida #campwatercolor #travel #floridavacation
  • ✏️Let the school year begin!! 3rd Grade and VPK here they come! Praying for safety over their school and for a wonderful year ahead! . . . #backtoschool #schooldays #schoolkids #lakewoodranch #prayingmom #lovemytribe

Sponsors

[adrotate group="2"]

Categories

DIY Beachy Art

Fall Favorites 2020

DIY Beachy Art

Fall Favorites 2020

  • Blog Info
  • Disclaimer
  • Archives
  • House Tours

Powered by ClikWiz