I have some GREAT news… our Rehab house is officially finished and sold! We close this week and say goodbye to the house that we gave an entirely new look! It’s both exciting and overwhelming! We are thrilled we were able to take a inhabited house that should have been condemned and made it a beautiful home worthy of loving occupants!
Now I get to start showing more details about the entire rehab project from the ground up. You saw the before photos in the last rehab update, so today I want to talk layout…
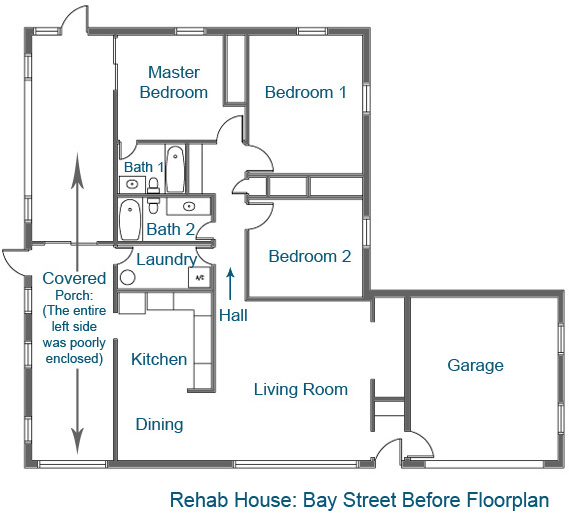
Here’s the ‘before’ floor plan:
Problems: This home featured all the bedrooms on one side, a closed in and dysfunctional layout and ‘weird’ additions.
- Entry/Living Room: When you walked through the door, you had the option of going straight into a closet, turning right into the garage or left into the house. Needless to say it was odd. The living area also had an alcove the served no purpose.
- Kitchen/Dining: Closed off and dysfunctional
- Entire Left Side: The entire left side of the house was a covered porch (which was poorly enclosed). There were random sliding glass doors, awkward places for doors and windows.
- Laundry: Opened from both sides, which created a lack of space for storage & privacy
- Master Bedroom/ Bath: The bedroom had a sliding glass door to the covered porch area and the bathroom was extremely tiny.
- Bedrooms: Overall this was only a 3 bedroom home and all of the bedrooms were on one side.
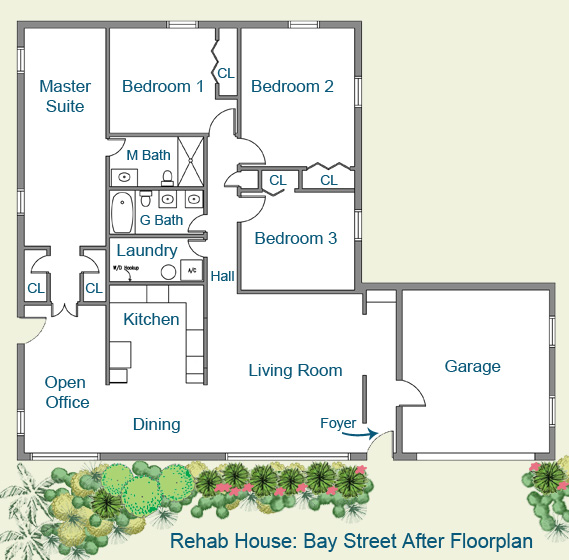
After some creative space planning, tons of sketches and some major auto-cad work, I came up with a perfect layout to update the home! We changed up the floor plan significantly! My goal was to take this outdated, closed in and dysfunctional layout and turn it into a more modern and open living concept throughout the main spaces. In addition, I decided to make it a split-plan by making the master suite on one side of the home and leaving the other bedrooms where they were.
Here’s how we addressed the problems:
- Entry/Living Room: I created a more inviting and open entry way and the plan was to have open shelving towards the back (more on this later). I really wanted the space to be more flexible for a good furniture layout and entertaining.
- Kitchen/Dining: We open up the kitchen by adding a large opening towards the living room. We couldn’t take the entire wall down because it was load bearing, which is fine because it allowed for more cabinet and storage space. The dining room has also been opened up by tearing the wall down that separated the “covered porch” and this space.
- Entire Left Side: This entire side has been transformed totally! We added an open office and a large master bedroom suite, plus a few of the windows and doors have been moved to fit with the new layout.
- New Master Bedroom/ Bath: Unlike homes from this era, the new master suite is quite large. It features his & her closets and an en-suite bath. We took the old master bathroom and the storage beside it and made an entirely new bathroom out those spaces. It now opens to the new master bedroom and features a functional layout with a large shower.
- Laundry: We closed in one of the door ways and moved the water heater and air register to create a more private space for clothes, cleaning etc.
- Bath 2: The overall layout in here was OK, except we felt with the amount of bedrooms back in this area, we needed to add two sinks.
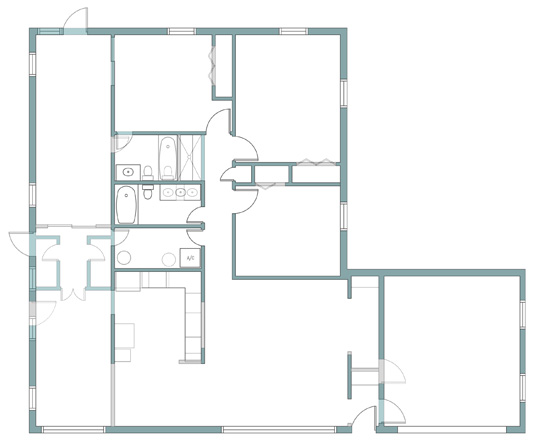
Just to give you perspective… here’s a shot of the before & after together…
As far as the kitchen layout goes, I plan on giving you a detailed plan of how we decided to layout the appliances, sink and cabinets. Next up on the rehab blog list… the concept & design plan/scheme.
What do you think of the layout? Have you rehabbed any houses lately? Any floor plan changes? Comment below and let us know!


It’s looking good! How about some before and after photos of the rehab house. 🙂